Sunday, January 22, 2012

New Years Cake Pops

Over the holidays this year I also worked to get my skill up on cake pops! First I made a couple of big batches  of the cake balls for a cookie exchange party and then for my BF to bring to work to practice.


 I decided to go big to celebrate the New Year with my new skills. I have found the key is to take your time getting the balls rolled, then freeze them for at least 15 min (or refrigerate if you are making them overnight). I then dip the stick like instructed in the candy coating then put into the cake pop, then freeze them for 15 minutes again to set the cake pop. I kept having them fall apart before I did this process and this last time making them I had none fall off the stick! Success!


Unfortunately I took all these pictures at night, but you can see the idea. To create the base that I placed them on, I used three foam circles from Michaels and used toothpicks to stick them together rather than glue so that I can take them apart if I want in the future. I wrapped the circles 
before I put them together in tissue paper rather than painting as I saw other places online again so I could take it apart and use this for another event. When I put the parts together, I wrapped each level in ribbon to smooth out the edges and make it decorative. 


I used for the coating silver sugar sprinkles, gold sugar sprinkles, and white candy balls to cover the cake pops (filling was vanilla frosting and butter pecan cake mix).To create the numbers I just got some frosting in a tube to write on them. Happy 2012!


And finally the New Years pic with B in front of the tree!


Catching Up.... starting with Colorado cross Country Skiing

Sometimes life gets busy and I miss to catch up on the blog! I am sure like you over the holidays you had friends over and family and spent time with them. Therefore, I am going to post just a bunch of pics that I took over the last month as I traveled and did work on the house!

First up in December, a fantastic friend of mine in Colorado asked me to come up and spend a few days at the YMCA of the Rockies. This fantastic and affordable location is a few miles north of Winter Park Colorado. With your stay, you have access to a vast facilities they have there including the cross country ski park. We stayed with a group of 15 in a cabin you can rent out. I actually got a cold the first day up there so the altitude got to me more than usual (you stay at above 9,000 feet, and coming straight from Arizona the altitude always is a consideration). My friend dayquil got me through the weekend!

Gorgeous View of the park from our cabin


Cabin we stayed in


My fantastic friend Brittany and her BF

Me looking out over the Valley


And me goofing off!


Wednesday, November 30, 2011

Gym makeover - just in time for the holidays

If you read my recap post on Thanksgiving you saw I really did not get the chance to overstuff myself from Thanksgiving meals. It is that time of year though - when way too many treats are available and you start to think about your New Years resolution. You know the one - the one you make every year to hit the gym more! I started this early with making over my home gym. Sure it took a year but better late than never! It is a work in progress- I have a thought to add more mirrors to the room. 


Here is what I started with. I always had a treadmill but felt crowded in the room. It was a gym/extra guest bed/desk room. Too much all at once!


I had the shelves also not even on the walls - one was on one wall, and the other shelf was on the other. It made it feel even more crowded.


Proof that it always looks worse before it looks better. 


And now the result so far! I still have work to do on the walls but so much easier to workout in this room. I moved in my bike and trainer (just in case I get on the triathlon track again) and my rebounder (which I started using when I learned about Tracy Anderson)


It still is a gym/desk area/ soon to be my craft area but looking much better. 


I also tried to make the many books we have look a little better by placing a few items between the book and changing the way they are stacked.


Monday, November 28, 2011

Thanksgiving Recap

I really had the best intentions to take more pics of Thanksgiving...but a root canal the day before threw those plans off track! Note to everyone - don't delay going to the dentist too long! What I thought would be a filling and crown turned into a 4 hour ordeal at the dentist with a tooth that did not want to cooperate with a root canal. I still pulled through on Thanksgiving with making the meal thanks to B's help (THANK YOU!!). Its one way to eat less on Thanksgiving!


Now down to the meal... I bailed on making cake pops (like I said the day before was pre-occupied) and also bailed on the homemade pie crust. We still made all the other fix in's that I planned thanks to all those Williams Sonoma tools I tried! Two turkeys, the stuffing, mashed potatoes and sweet potatoes.....The best was the potato ricer - it was just fun to put the potato through that instead of mashing. Kinda that when you played with play doh as a kid (ahem) and made the play doh hair (was I the only person who liked doing that???) After the day was over I realized that I did not have any pics of food - I guess if you are having issues eating it my mind did not go to taking pics of it, so here are other pics of the day.


As for the table, I just put on the items I had from last year- when in doubt pull together what you already have!


The real fun on Thanksgiving was the football. If a bunch of people are playing, the pics just mostly ended up of my cute niece.

She's got mad skills... much better than watching football on TV


Are kids just playing and laughing the cutest??


Her daddy my brother teaching her how its done.


Dad


Brian Tossing the ball around


And for one last close up of cuteness 


Hope you had a happy Thanksgiving!

Monday, November 21, 2011

Apple Pie with Williams Sonoma Piecrust Cutters

I have never made a pie - sure I had some of those pre made pies I heated up but never made a pie from scratch. Since I have never done this I thought to get a head start on Thanksgiving by making one over the weekend as a trial run for the big Turkey day. I admit I did cheat  the filling with an apple mix from Trader Joe's, but the crust was my first ever by hand!


I used the Williams Sonoma recipe for Basic Pie Dough - check out the site for the details, but here are the ingredients. 

Ingredients:

  • 1 1/4 cups unbleached all-purpose flour
  • 1 Tbs. sugar
  • 1/4 tsp. salt
  • 8 Tbs. (1 stick) cold unsalted butter, cut into 1/4-inch cubes
  • 3 Tbs. very cold water
If I can make a pie turn out like this the first time - you can too! The Williams Sonoma Piecrust cutters are the key to this! 


First I started with the ingredients in the recipe and used my new kitchen toys from Williams Sonoma - an Emile Henry Pie Dish and the Piecutters.


These piecrust cutters make all the difference. I was not perfect with the edges on the pie crust, but adding these made the edges looking uniform and decorative! Just a tip - someone at Williams Sonoma said these designs change from year to year so if you like them, get them now!


I then just used the pie cutters to cut the designs out and placed them around the edges.


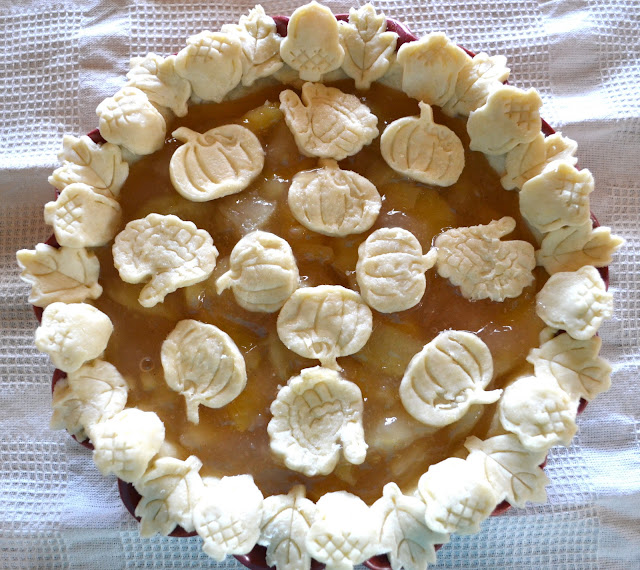
TA DA! Here are the leaves and acorns around the edges.


 After putting in the filling, I then placed a few turkeys and pumpkins in the middle.


If you are a newbie like I was, I read online that placing foil around the edges helps with browning so that the edges do not burn. I took them after 10 minutes before the pie was done cooking. I cooked this for 1 hour at 350, but I have a convection oven so yours may be more or less.


And it is done! 


Related Posts Plugin for WordPress, Blogger...